29 Mar 2023
blog
RabbitMQ
rabbitmq
Installing RabbitMQ and exposing the dashboard
RabbitMQ is an open-source message-broker software. A message broker is a sophisticated application which facilitates communication between two or more systems or applications. This communication can be unidirectional or bidirectional, and is typically transmitted in the form of messages. RabbitMQ is used for asynchronous communication between applications, which can help reduce latency and ensure scalability. It is also used for distributed systems, microservices, and cloud-based architectures.
In this blog, I will guide you through the process of installing RabbitMQ on an Ubuntu server and expose its dashboard using Cleavr. Several Cleavr clients have asked for information on how to install RabbitMQ on an Ubuntu server and expose the dashboard using Cleavr. So, we've created this blog post to guide you through the entire process, step-by-step.
RabbitMQ Installation and Dashboard exposure using Cleavr
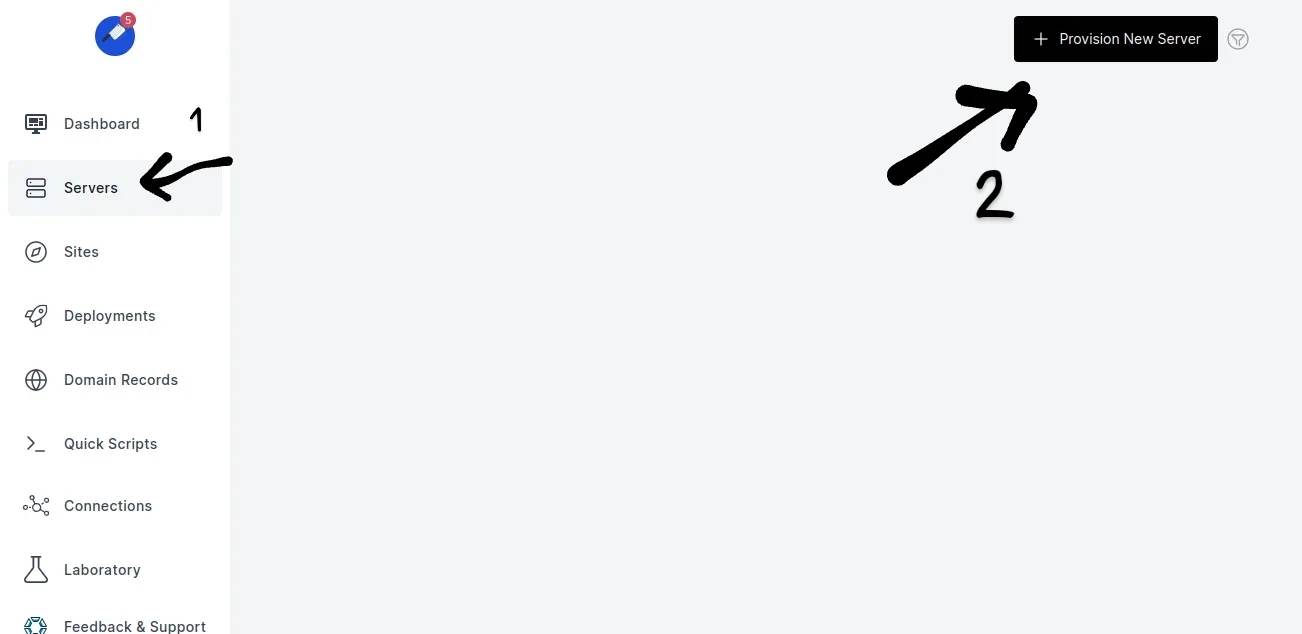
Step 1: Provisioning New Server in Cleavr
First, we need to provision a new server in cleavr. To know more about provisioning new server in cleavr, you can read this documentation Provision Servers.
Go to the Servers section and click on the + Provision New Server button:
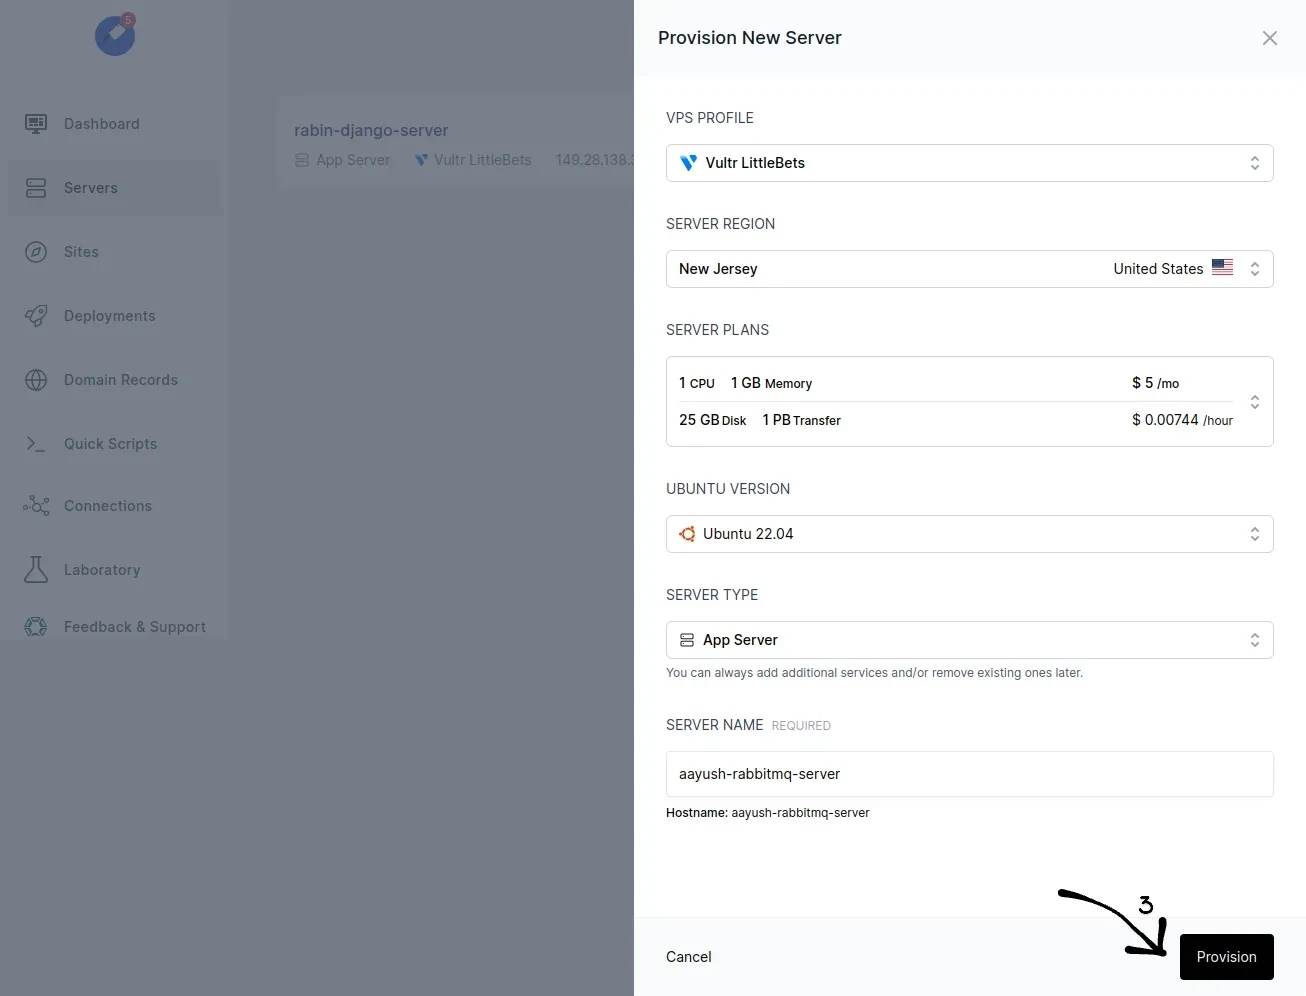
Next, set up your server according to your preferences. In my case, I have chosen the server region as Singapore, server type as App Server, and named my server as aayush-rabbitmq-server.
Click on the Provision button, wait for a few minutes, and now you have created your server.

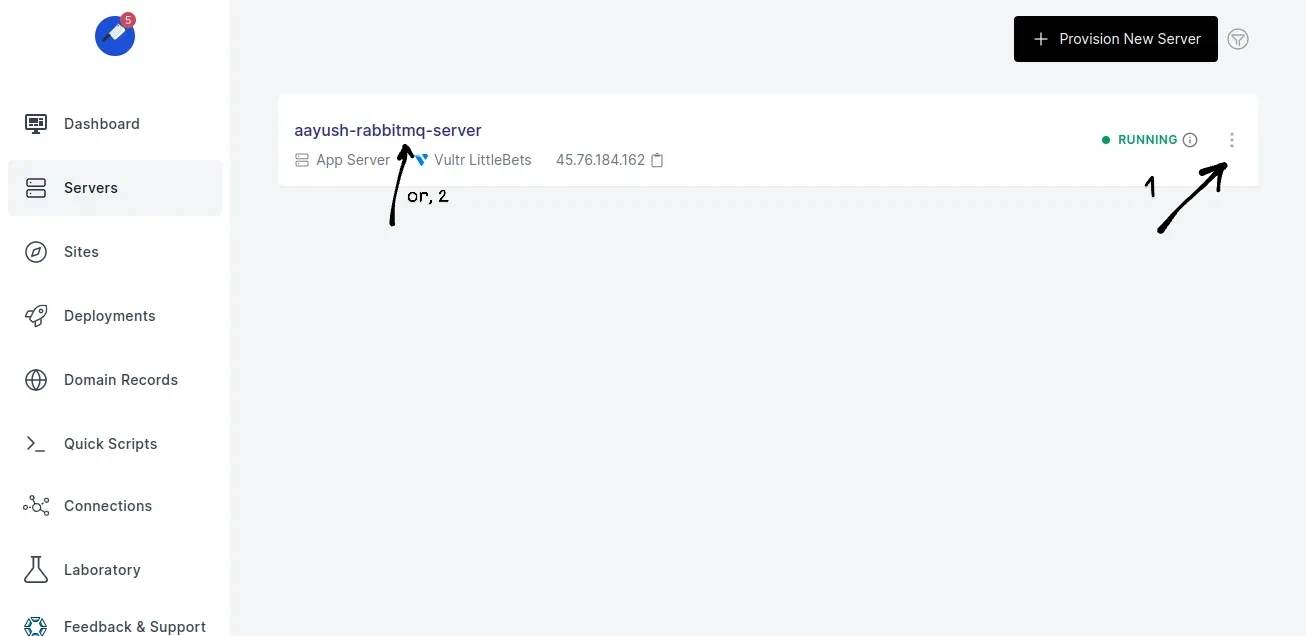
After successfully provisioning the server, we’ll now SSH into our newly created server through our local terminal so let’s add our public SSH key.
Step 2: Adding SSH Key in server
To find out your SSH public key, on a Unix system, you can run the command cat ~/.ssh/*.pub in your local terminal.
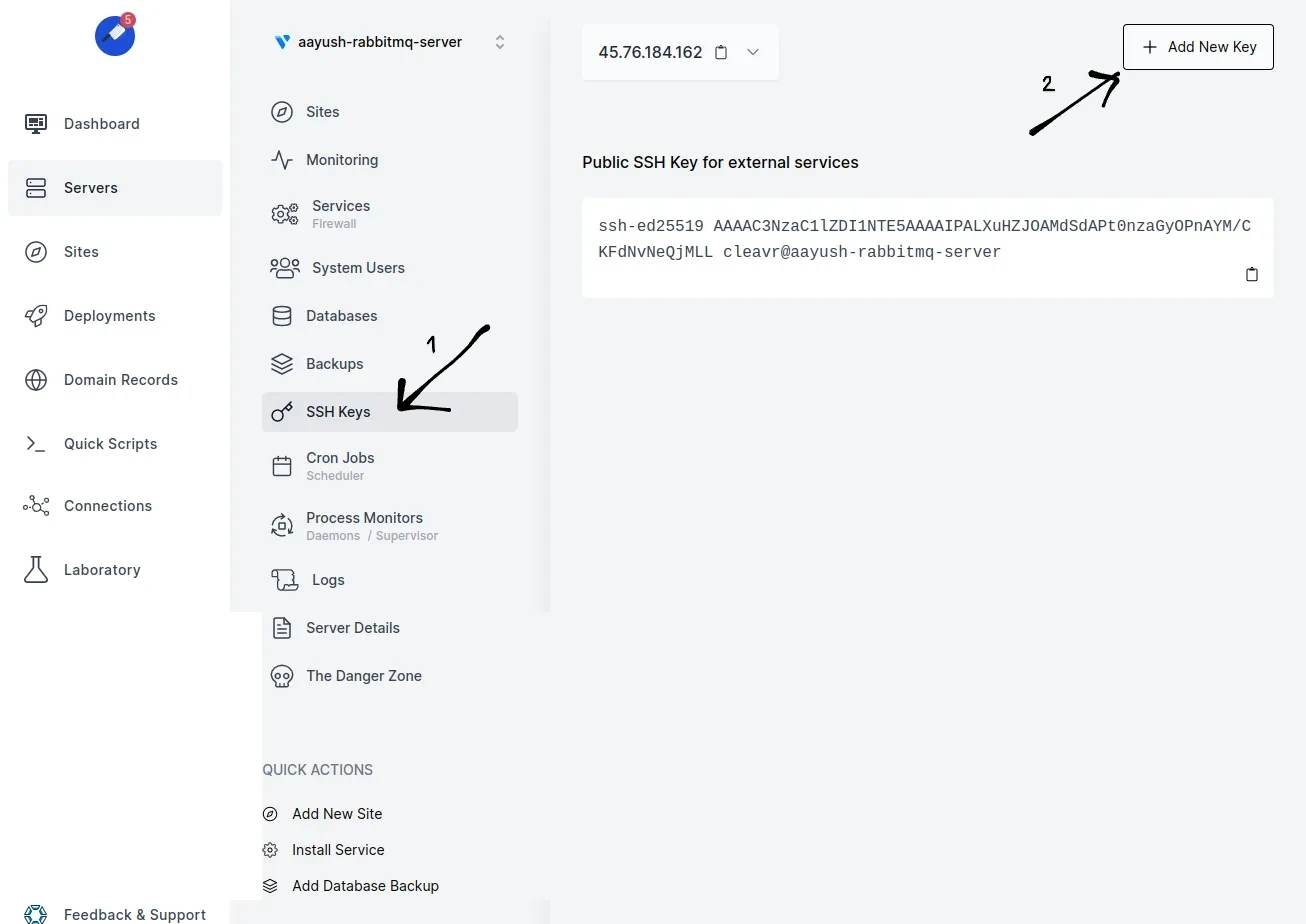
Now, click on the server name or kebab menu (also, known as 3 dot menu) and select SSH Keys.
I have clicked on kebab menu and selected SSH Keys
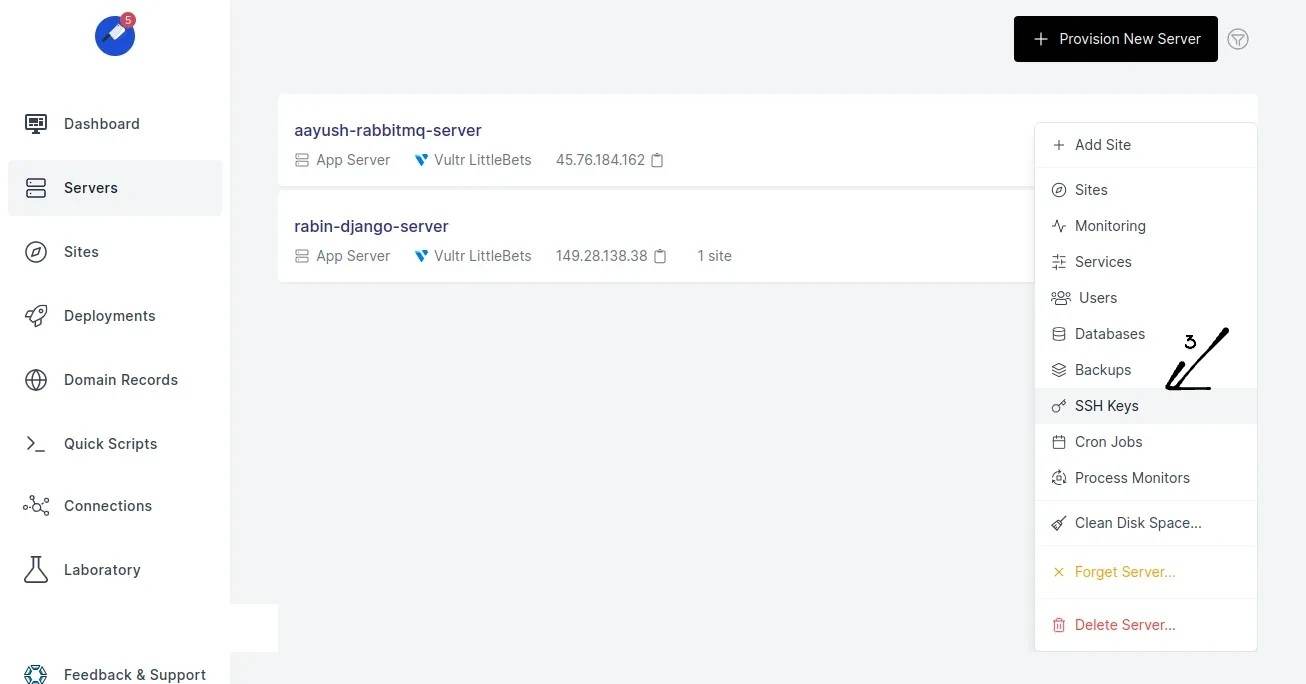
After selecting the SSH Keys, click on the Add New Key button.
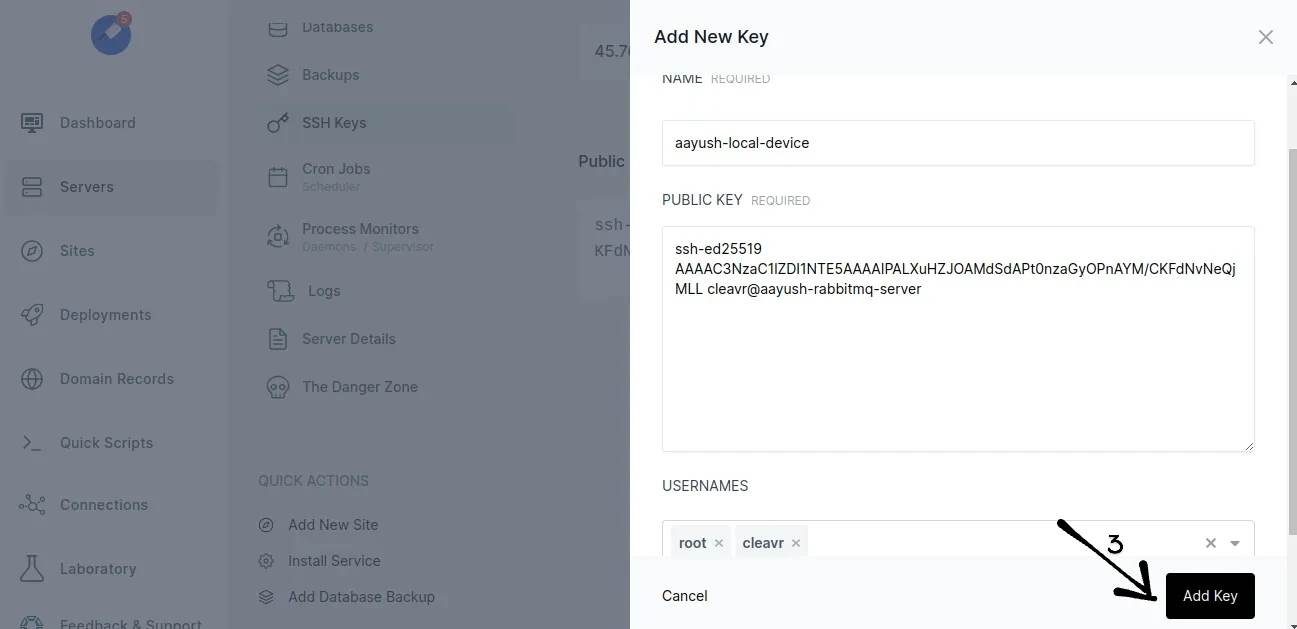
Provide the name, public key, and usernames and click on the Add Key button.
I have given the name as aayush-local-device and selected both root and cleavr as my usernames.
We’ll install RabbitMQ on our server as root and I have selected username cleavr so I can check whether RabbitMQ is also running for user cleavr or not which I will be showing you later in step 5.2.

Step 3: Connecting to the server remotely
After successfully adding the SSH public key, now we can remotely connect to the server using our local terminal.
Open your local terminal and run the command ssh root@ip
where, IP is the public IP address of your server that you provisioned in Cleavr. In order to install RabbitMQ on our server we need to access our server remotely as a root user.

After you have connected to the server remotely, you can start installing RabbitMQ on your server.
Step 4: Installing RabbitMQ in our server
Instead of running each installation command on the command line, why not automate it?
Now, let us encapsulate a set of commands to install RabbitMQ into a script saving us keystrokes at the command line. You could also reuse this script in your other servers if you want.
First, create a new text file with a .sh extension. I have created a file rabbitmq_installation.sh by running the command sudo vim rabbitmq_installation.sh.
You can use any editor of your choice. To install vim you can run the command sudo apt install vim or follow this guide Ubuntu Linux Install vim Text Editor
Now insert the following script in your .sh file and save the file.
#!/usr/bin/sh

sudo apt-get install curl gnupg apt-transport-https -y

## Team RabbitMQ's main signing key
curl -1sLf "https://keys.openpgp.org/vks/v1/by-fingerprint/0A9AF2115F4687BD29803A206B73A36E6026DFCA" | sudo gpg --dearmor | sudo tee /usr/share/keyrings/com.rabbitmq.team.gpg > /dev/null

## Launchpad PPA that provides modern Erlang releases
curl -1sLf "https://keyserver.ubuntu.com/pks/lookup?op=get&search=0xf77f1eda57ebb1cc" | sudo gpg --dearmor | sudo tee /usr/share/keyrings/net.launchpad.ppa.rabbitmq.erlang.gpg > /dev/null

## PackageCloud RabbitMQ repository
curl -1sLf "https://packagecloud.io/rabbitmq/rabbitmq-server/gpgkey" | sudo gpg --dearmor | sudo tee /usr/share/keyrings/io.packagecloud.rabbitmq.gpg > /dev/null

## Add apt repositories maintained by Team RabbitMQ
sudo tee /etc/apt/sources.list.d/rabbitmq.list <<EOF
## Provides modern Erlang/OTP releases
##
## "bionic" as distribution name should work for any reasonably recent Ubuntu or Debian release.
## See the release to distribution mapping table in RabbitMQ doc guides to learn more.
deb [signed-by=/usr/share/keyrings/net.launchpad.ppa.rabbitmq.erlang.gpg] http://ppa.launchpad.net/rabbitmq/rabbitmq-erlang/ubuntu $(lsb_release -cs) main
deb-src [signed-by=/usr/share/keyrings/net.launchpad.ppa.rabbitmq.erlang.gpg] http://ppa.launchpad.net/rabbitmq/rabbitmq-erlang/ubuntu $(lsb_release -cs) main

## Provides RabbitMQ
##
## "bionic" as distribution name should work for any reasonably recent Ubuntu or Debian release.
## See the release to distribution mapping table in RabbitMQ doc guides to learn more.
deb [signed-by=/usr/share/keyrings/io.packagecloud.rabbitmq.gpg] https://packagecloud.io/rabbitmq/rabbitmq-server/ubuntu/ $(lsb_release -cs) main
deb-src [signed-by=/usr/share/keyrings/io.packagecloud.rabbitmq.gpg] https://packagecloud.io/rabbitmq/rabbitmq-server/ubuntu/ $(lsb_release -cs) main
EOF

## Update package indices
sudo apt-get update -y

## Install Erlang packages
sudo apt-get install -y erlang-base \
                        erlang-asn1 erlang-crypto erlang-eldap erlang-ftp erlang-inets \
                        erlang-mnesia erlang-os-mon erlang-parsetools erlang-public-key \
                        erlang-runtime-tools erlang-snmp erlang-ssl \
                        erlang-syntax-tools erlang-tftp erlang-tools erlang-xmerl

## Install rabbitmq-server and its dependencies
sudo apt-get install rabbitmq-server -y --fix-missing
The script can be found at Cleavr’s library of quick scripts. Additionally, Cleavr's Quick Scripts feature can also be utilized to install the script. Instructions for utilizing this feature are available at quick-scripts.
After saving your file, run the command sudo chmod +x ./rabbitmq_installation.sh to make the file executable.
Now you can simply run ./rabbitmq_installation.sh whenever you want to install RabbitMQ possibly on different servers in future.
After successfully running the installation, run the following command to start and check the status of rabbitmq-server respectively:
sudo systemctl start rabbitmq-server && systemctl status rabbitmq-server
The output should look something like the figure below.
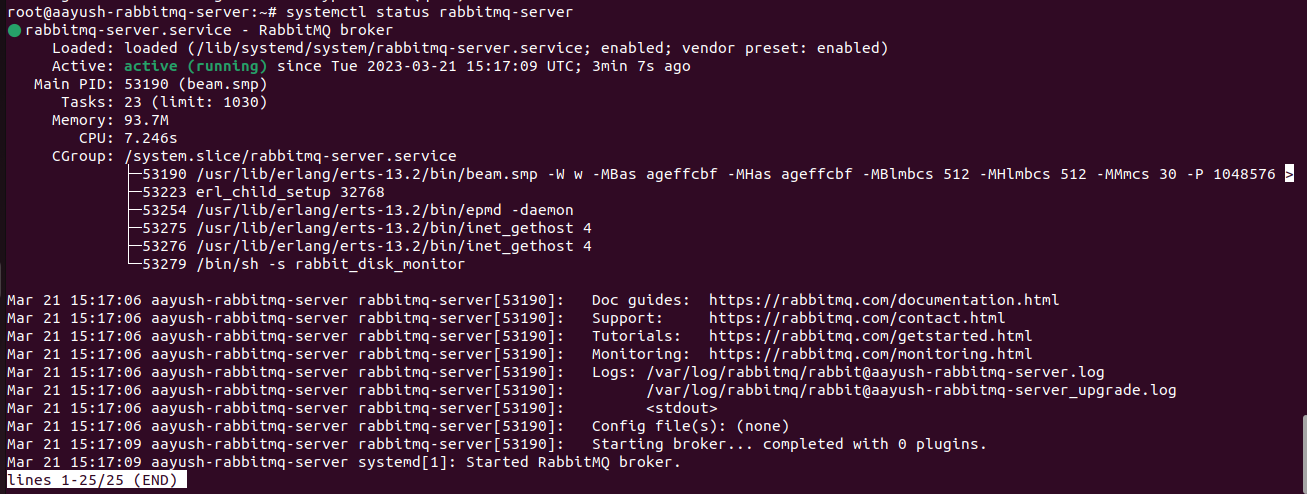
Notice the green color active? Congratulations! You have successfully installed and started RabbitMQ on your Cleavr server🎉
Watching and Restarting RabbitMQ Server Automatically
By now we have installed and started RabbitMQ on our server but what if it stops due to some reason? For that we would have to SSH into the server again and restart the program. But, Cleavr's Process Monitors can take care of it for you! They'll watch the process running on your server and automatically restart it if needed, so you don't have to SSH in manually each time.
A process monitor watches processes that are running on your servers and restarts the service if needed. For more information you can read the documentation: Process Monitors
To add the Processor Monitor, go to the Servers > select Process Monitors > click on + Add New Process Monitor button
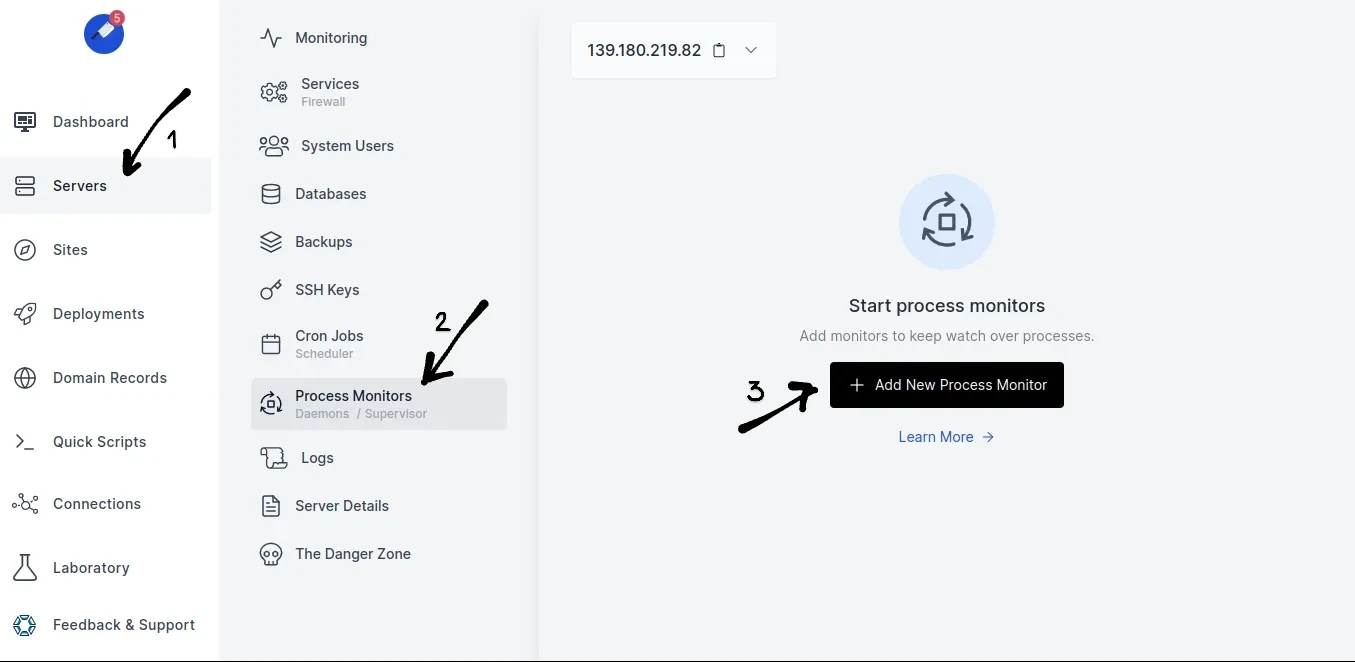
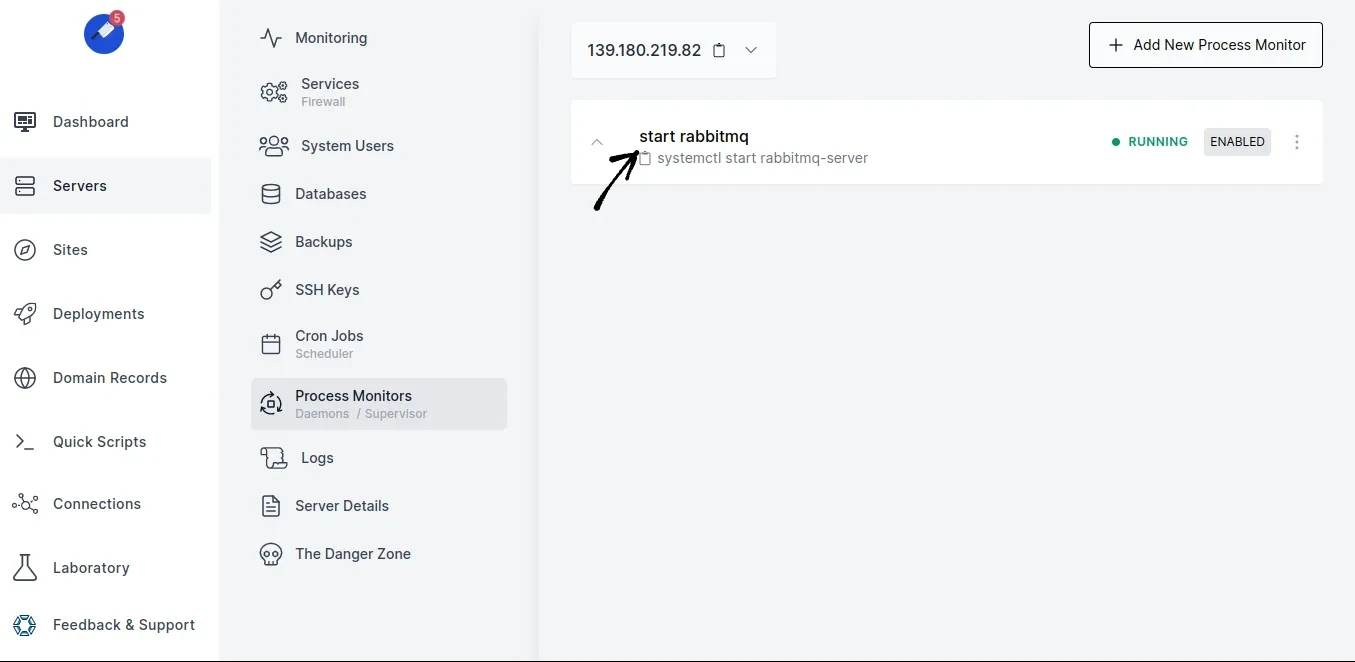
Then setup your New Process Monitor and click on Add Process Monitor. I have written NAME as start rabbitmq, the COMMAND is systemctl start rabbitmq-server and written RUN AS to root as shown below

We have successfully added a new process monitor.
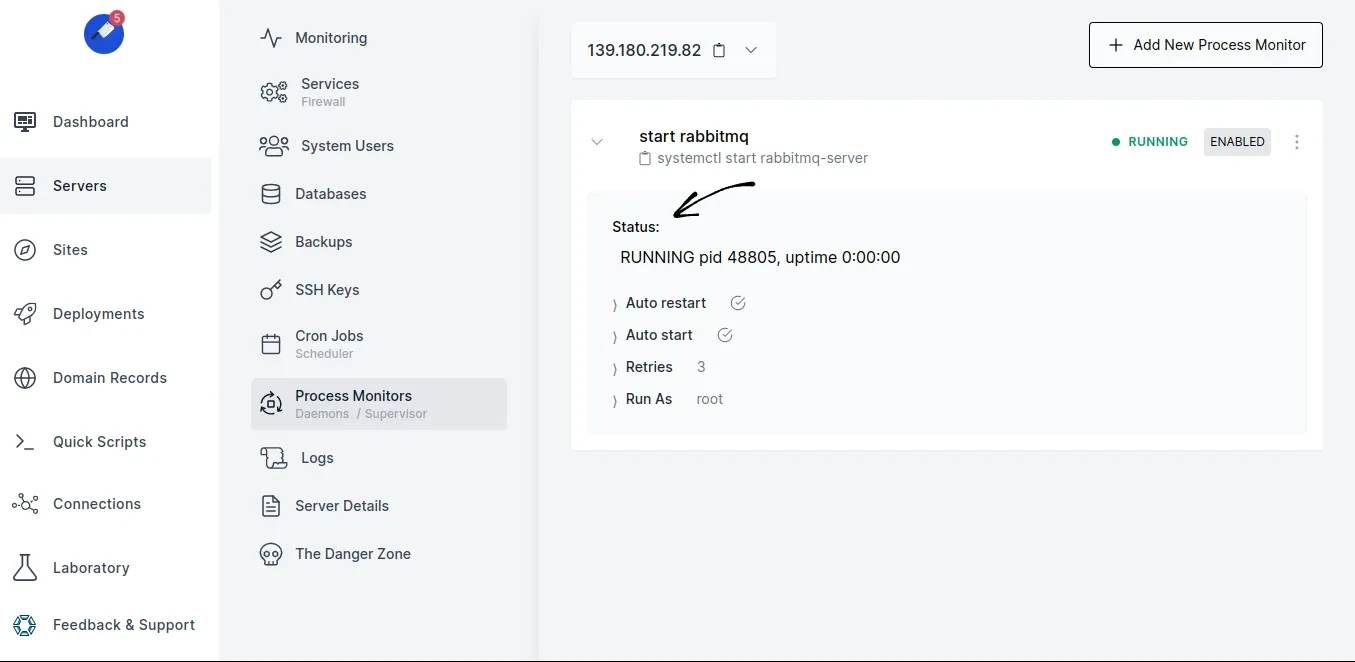
Once we have created the Process Monitor, we can click on the kebab menu and click on Check Status to view the status of our newly added process monitor.
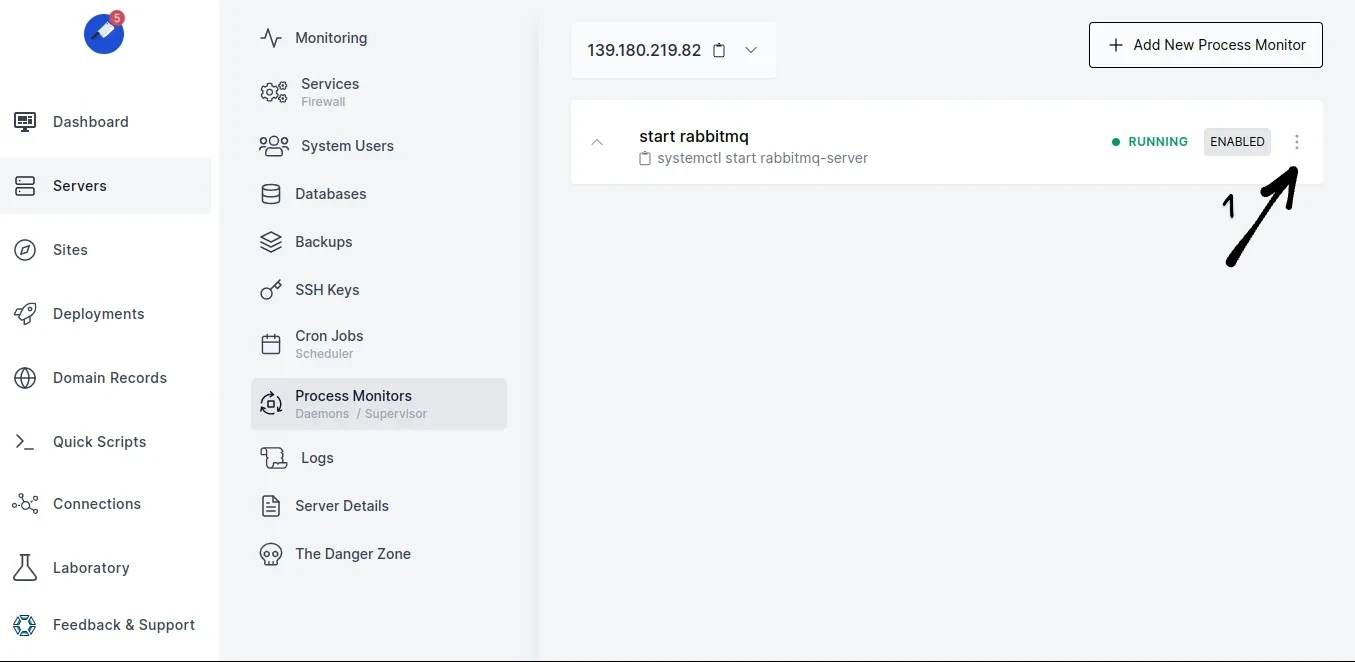
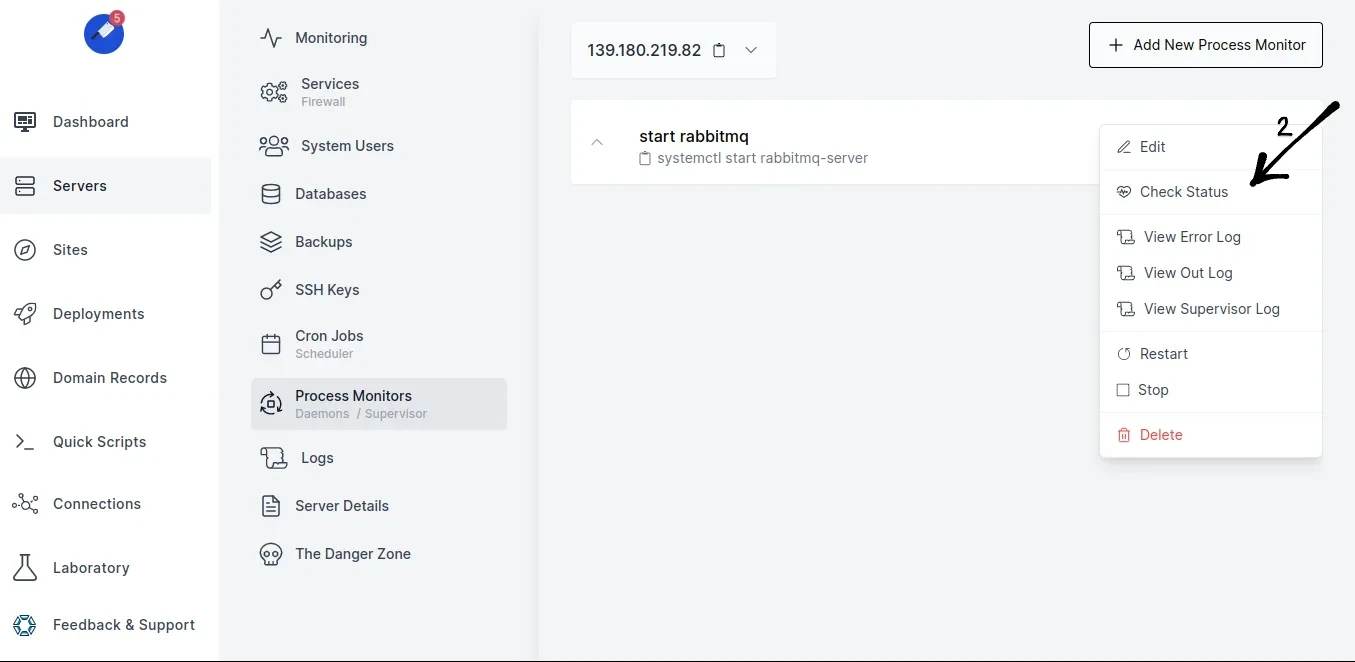
The View Error Log or View Out Log are used to check logs.
Step 5: Exposing the RabbitMQ dashboard using Cleavr
Now, it's time to expose the dashboard using Cleavr. But, before that, like any other plugins, we must enable the management plugin which is included in RabbitMQ distribution.
The RabbitMQ management plugin provides an HTTP-based API for management and monitoring of RabbitMQ nodes and clusters, along with a browser-based UI and a command line tool, rabbitmqadmin.
5.1. Enabling RabbitMQ Management Plugin
Run the command rabbitmq-plugins enable rabbitmq_management to enable the management plugin.
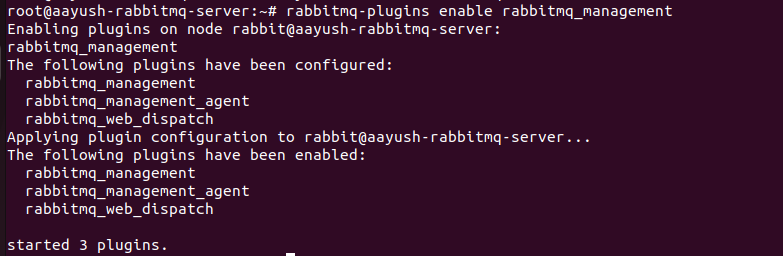
By default the port to access the management UI/Dashboard is 15672. You can also run the command rabbitmq-diagnostics -s listeners to inspect what protocols and ports the node is listening on for client, CLI tool and peer connections.

In my case, the port is 15672. Also, we need to make sure that our RabbitMQ is running on user: cleavr
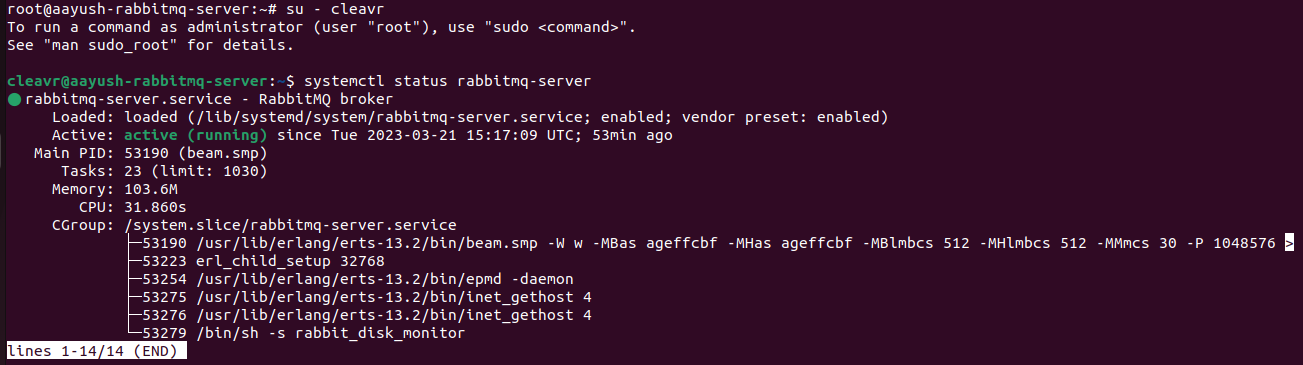
5.2. Verifying RabbitMQ status in user: cleavr
Run the command su - cleavr to switch to user cleavr.
After switching the user from root to cleavr, let us check the status of our RabbitMQ server. Run the command sudo systemctl status rabbitmq-server.
You should be able to see status Active as active (running) as shown in the figure below
Finally, we will be able to expose the RabbitMQ dashboard in Cleavr. To do so, let us first create a site on the Cleavr server. Run the command logout to switch back to root
5.3. Creating site and exposing the RabbitMQ dashboard/UI in Cleavr
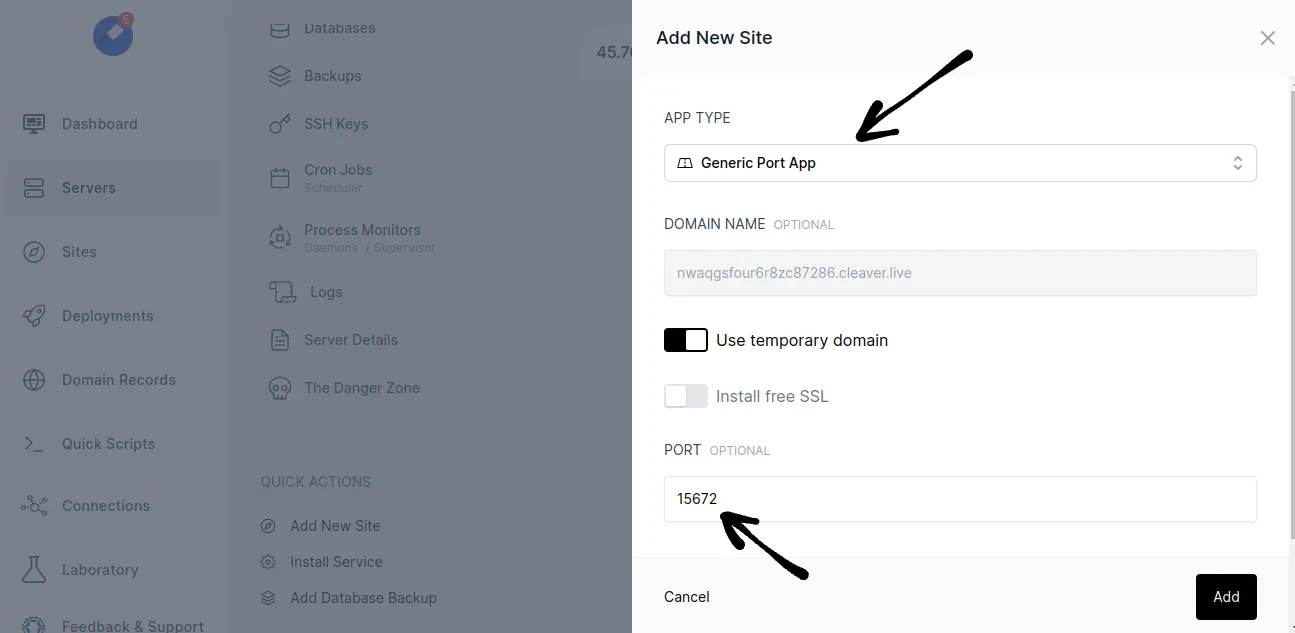
To create a site, you need to head to your Cleavr server. Once you are in your Cleavr server click + Add Site button.

You have to select APP TYPE as Generic Port App and enter the PORT of the RabbitMQ management UI, which we inspected in step 5.1, which was 15672. For username put in cleavr.
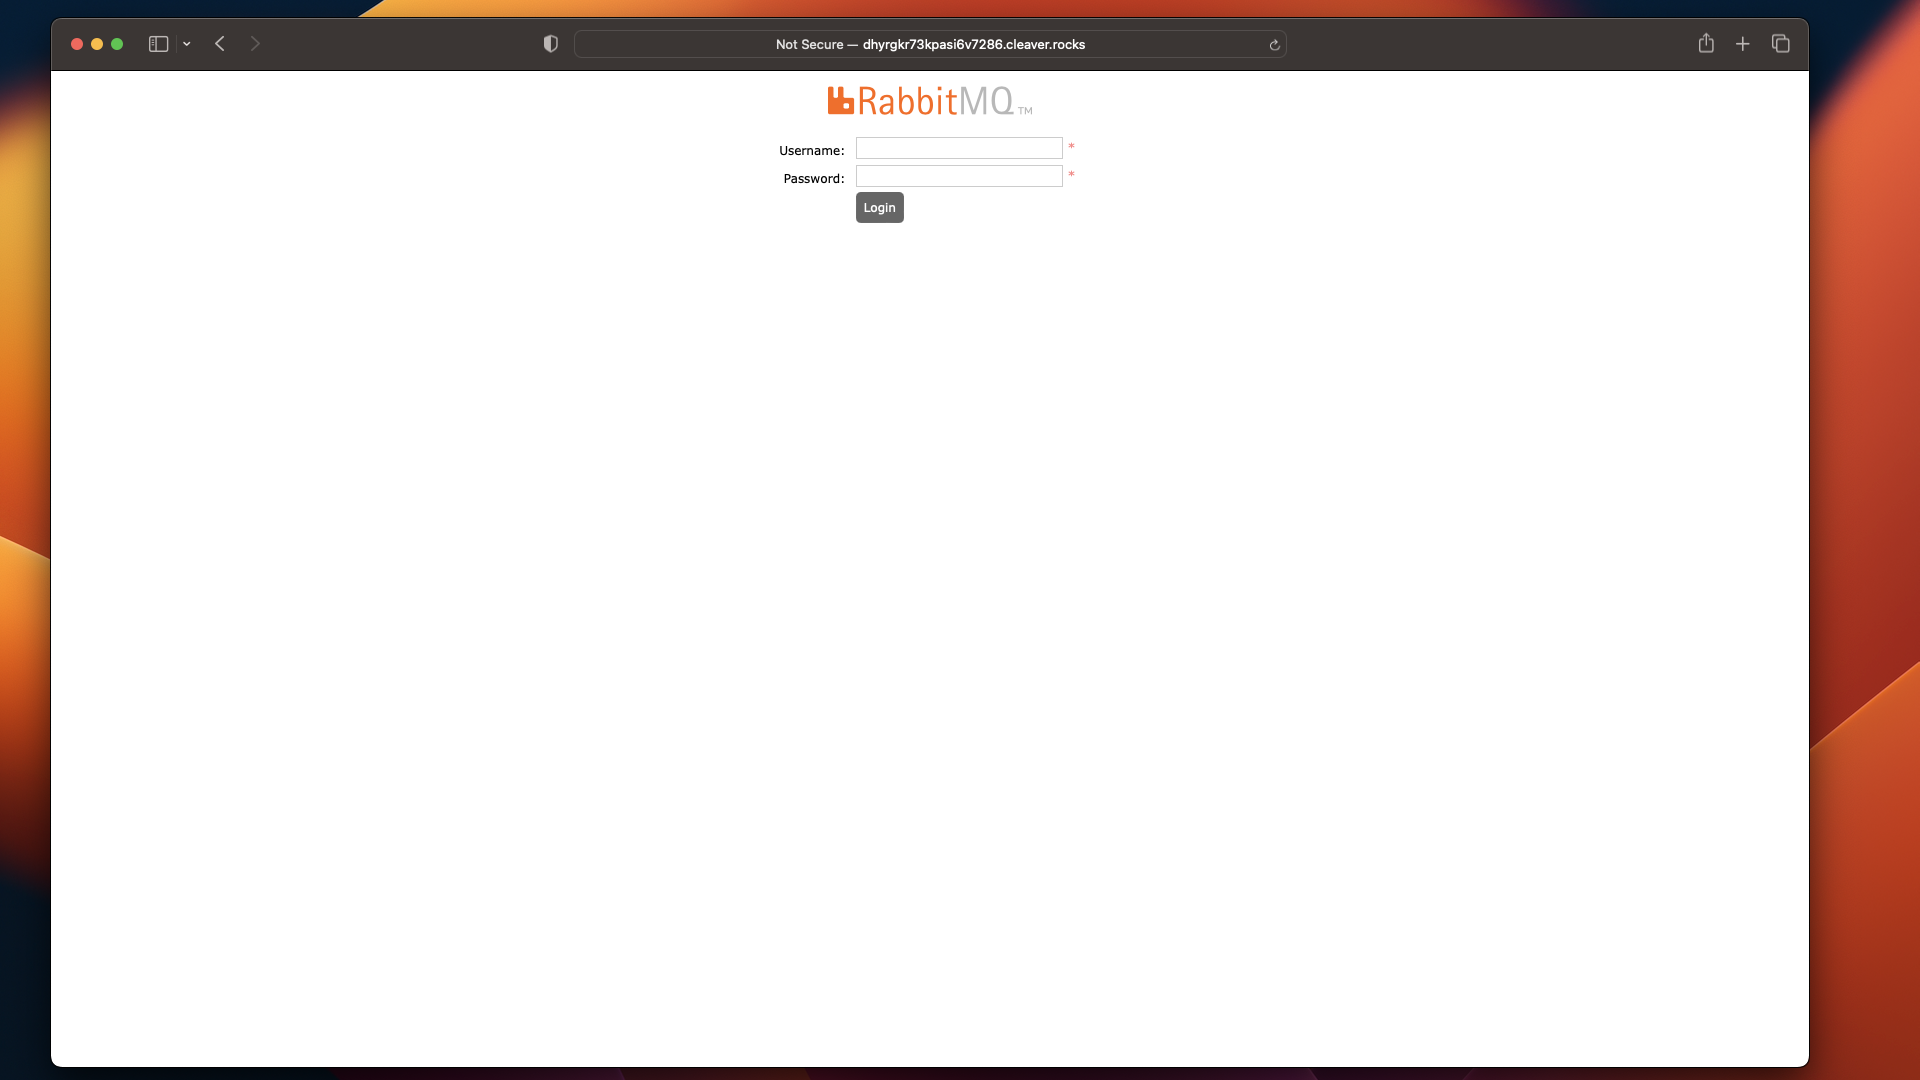
Congratulations! You have successfully exposed your RabbitMQ Dashboard using Cleavr 🎉
We've learned how to install RabbitMQ on an Ubuntu server and how to expose its dashboard using Cleavr. By following the steps outlined in this guide, you can set up a reliable and scalable message queue that allows your applications to communicate more efficiently. With Cleavr, you have a powerful tool to manage your server and simplify the deployment process.
I hope you found this guide helpful and that you're now ready to try out RabbitMQ and Cleavr for yourself, which you can start with a free trial and try it out. Don't hesitate to share any additional tips or tricks you discover along the way on our forum.
Take control of your servers and deployments.Without breaking a sweat.
Sign up for a 5-day free trial of Cleavr Pro. No credit card required until you decide to subscribe.
Sign up for freeCleavr
© 2026 Vistafari LLC. All rights reserved.
❤️ ☕️ 🎨