20 April 2022
blog
Soketi Server for RealTime Updates (Part 3 - 1-Click Installation)
If you’ve followed along with our previous blog post about Soketi installation, you may have thought that was a lot of work!
Feedmas, another product from the team behind Cleavr, was built using the Laravel framework and leverages Soketi for real-time data needs. The first blog posts of this series duplicates the efforts we put into setting up a Soketi server for our Feedmas application. Which, was quite a bit of work.
Since we've experienced first hand the level of effort it takes to get a WebSocket server up and running, we've decided to come up with an easier solution!
The 1-click Soketi installation is the quickest and easiest way for you to get your WebSocket server ready-to-go.
Today, I’ll be showing you how you can set up a production-ready Soketi server in just one click.
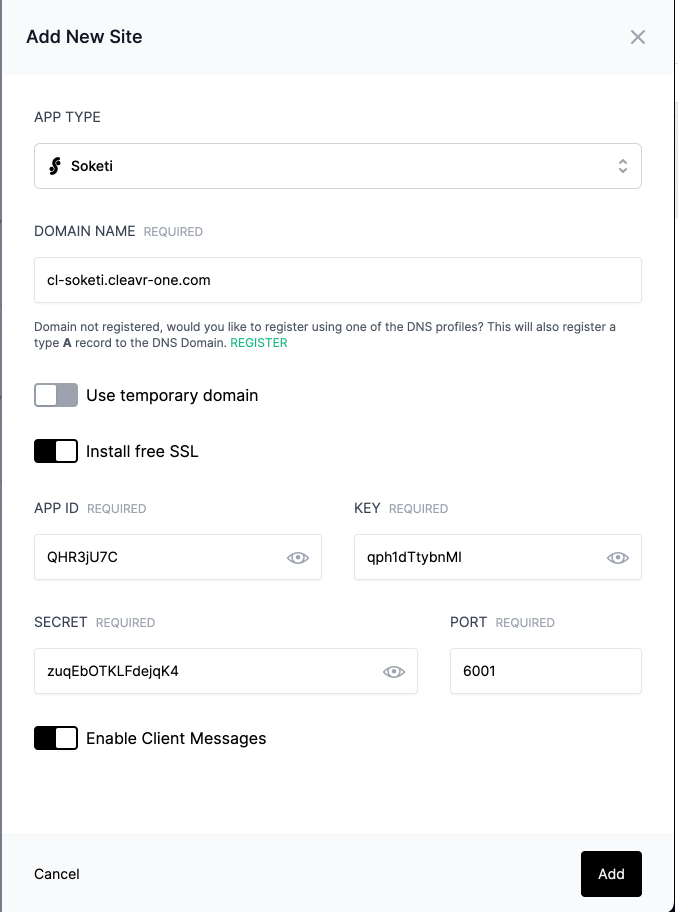
Head over to the site section (Server > Sites) and click on the Add Site button. For the app type, select Soketi.
Provide your desired domain name, or you can use a free Cleavr provided domain by enabling Use temporary domain.
The default port Soketi uses is 6001.
Enable the Enable Client Messages option if you want to enable client messages for the app, which is set to false by default.

BOOM!! Let’s hit the add button, and it's ready.
Cleavr took care of the full installation and basic configurations. 😉
Part 1: How to install Soketi Server
Take control of your servers and deployments.Without breaking a sweat.
Sign up for a 5-day free trial of Cleavr Pro. No credit card required until you decide to subscribe.
Sign up for freeCleavr
© 2025 Vistafari LLC. All rights reserved.
❤️ ☕️ 🎨
