8 October 2025
blog
YouTrack Helpdesk Integration
In this blog, we’ll discuss how to integrate YouTrack’s Helpdesk.
Recently, we started discussing an alternative to our current help desk application, Feedmas. We had previously tried other alternatives such as Feedback Fish and Zoho Desk.
Since we are already using YouTrack, we wanted to give YouTrack’s Helpdesk a try. What really made sense about using YouTrack’s Helpdesk is its ability to let users keep track of the support requests they have submitted.
We assume that you already have a YouTrack instance created. If not, you can create a new instance from this link
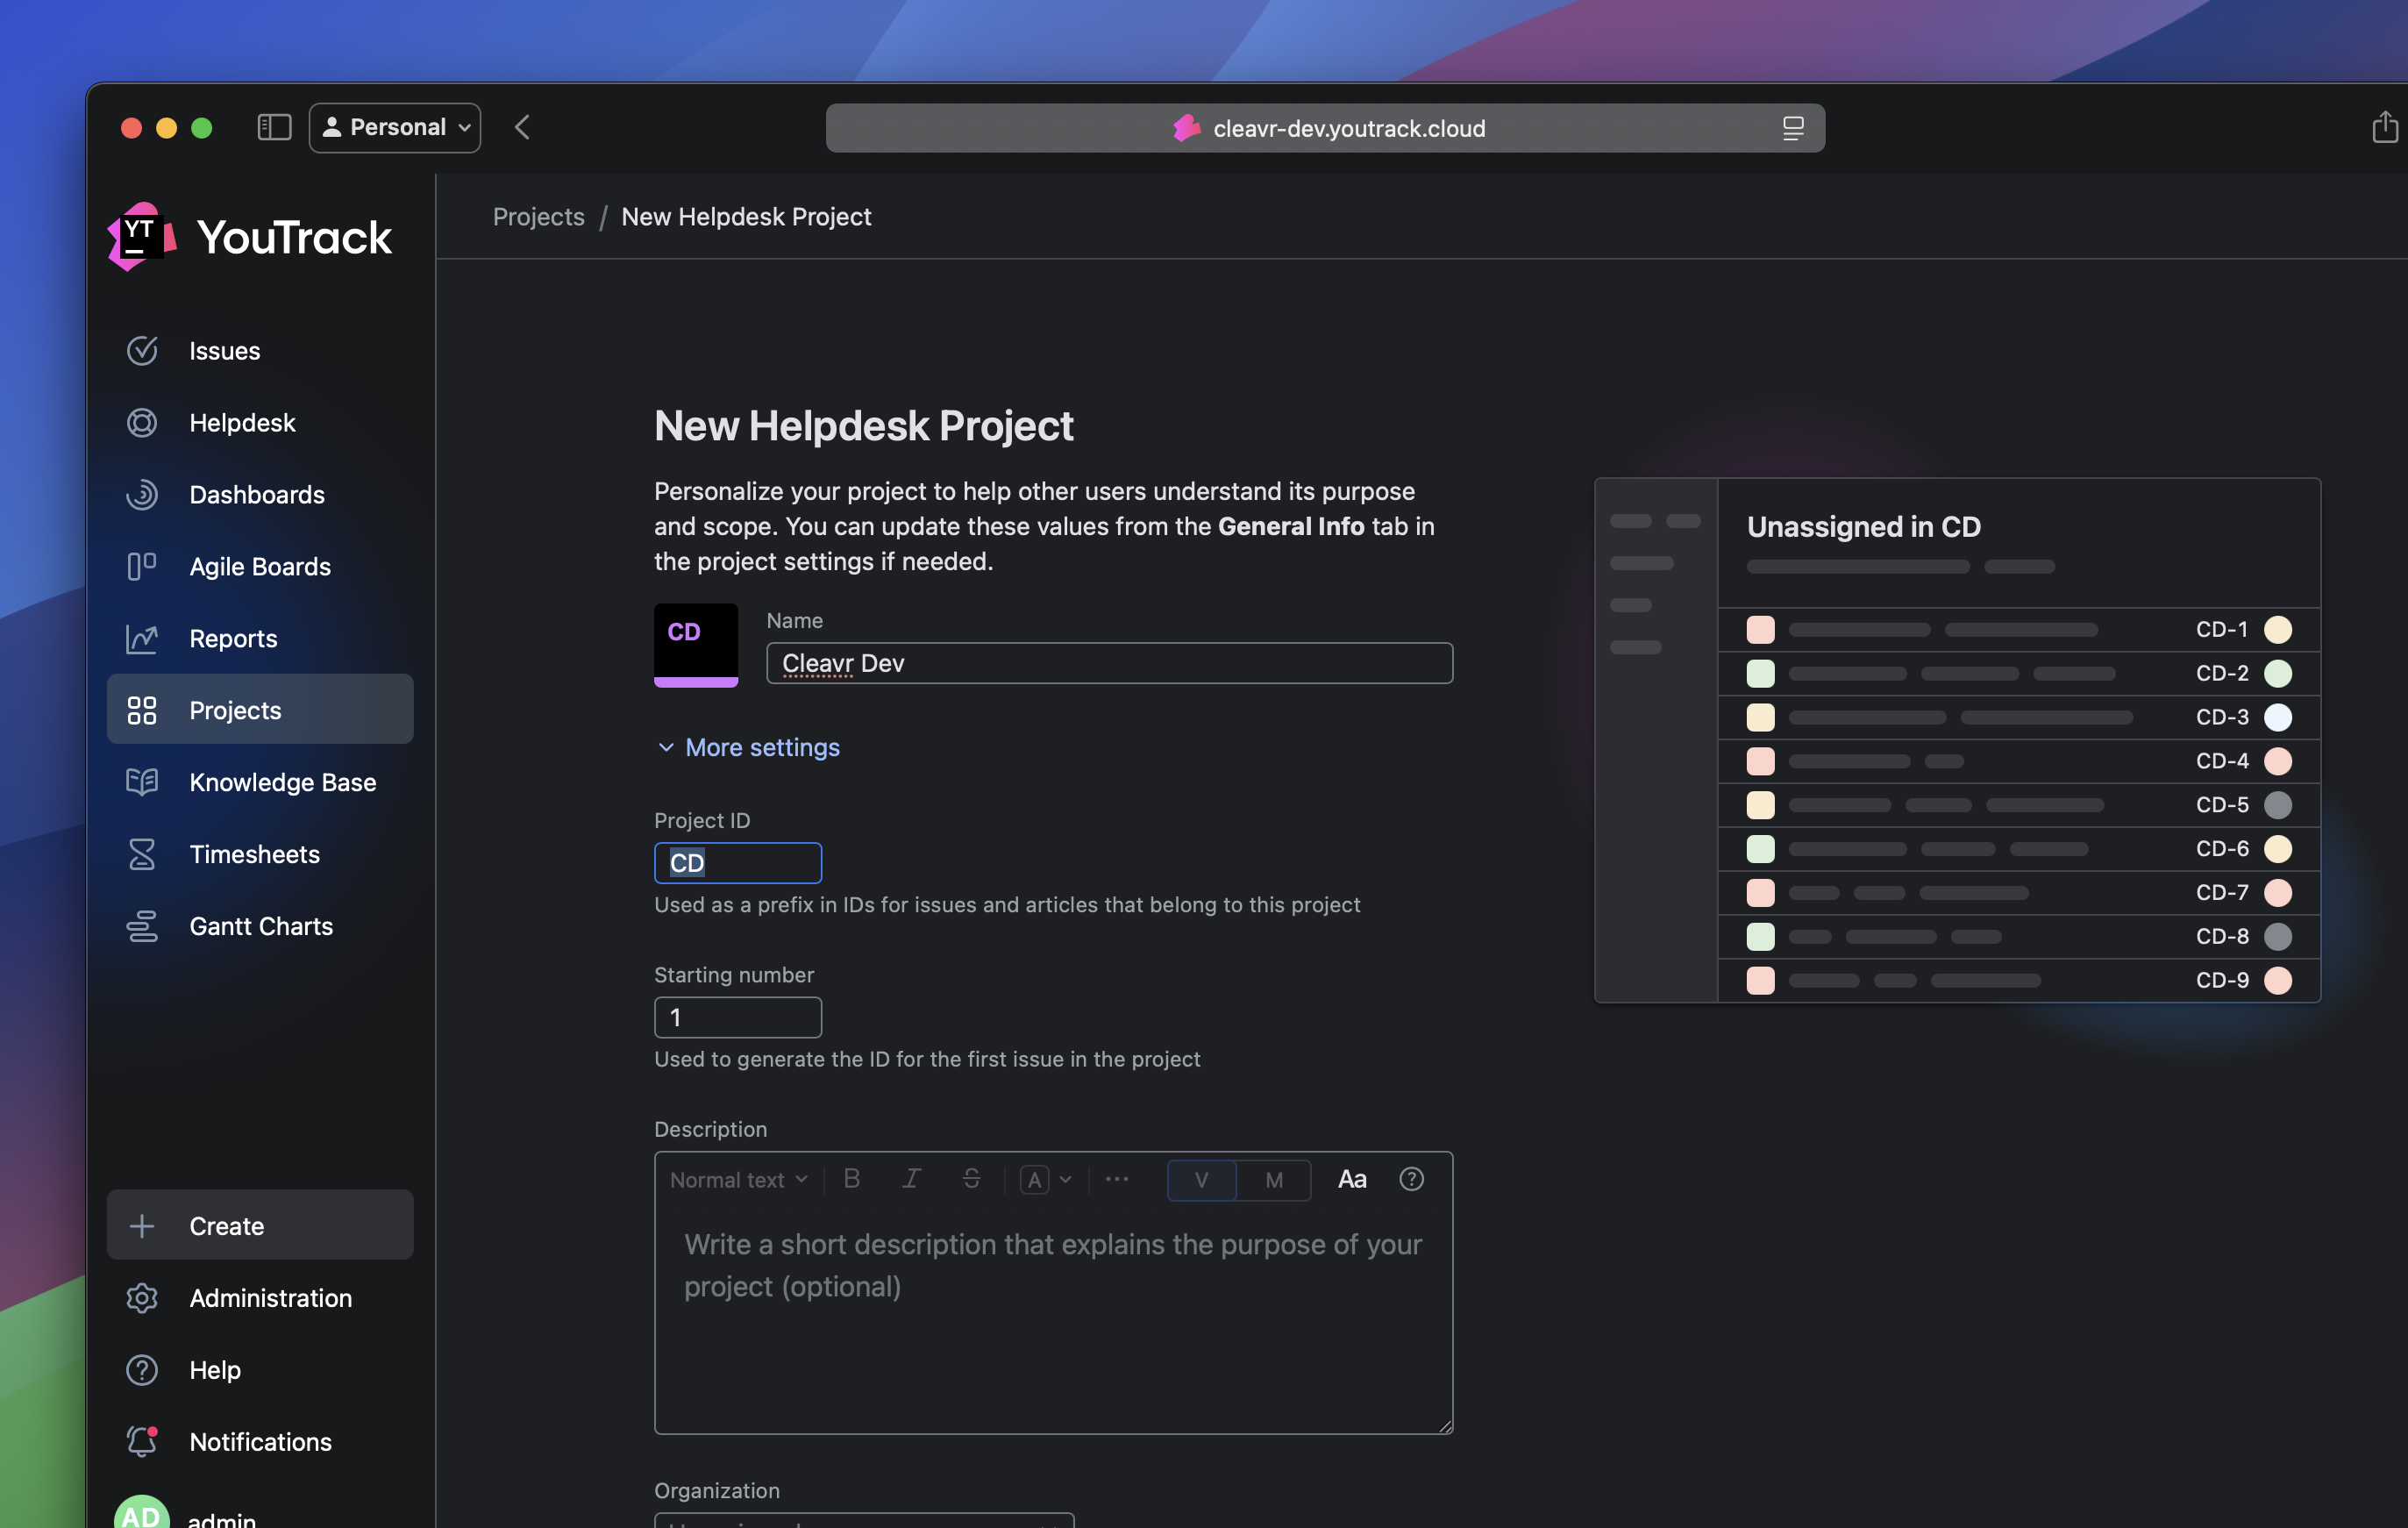
You can start configuring your Helpdesk project by navigating to Projects from the sidebar. To create a new
Helpdesk project, click on New Project and choose Helpdesk to create a new project using the provided template.
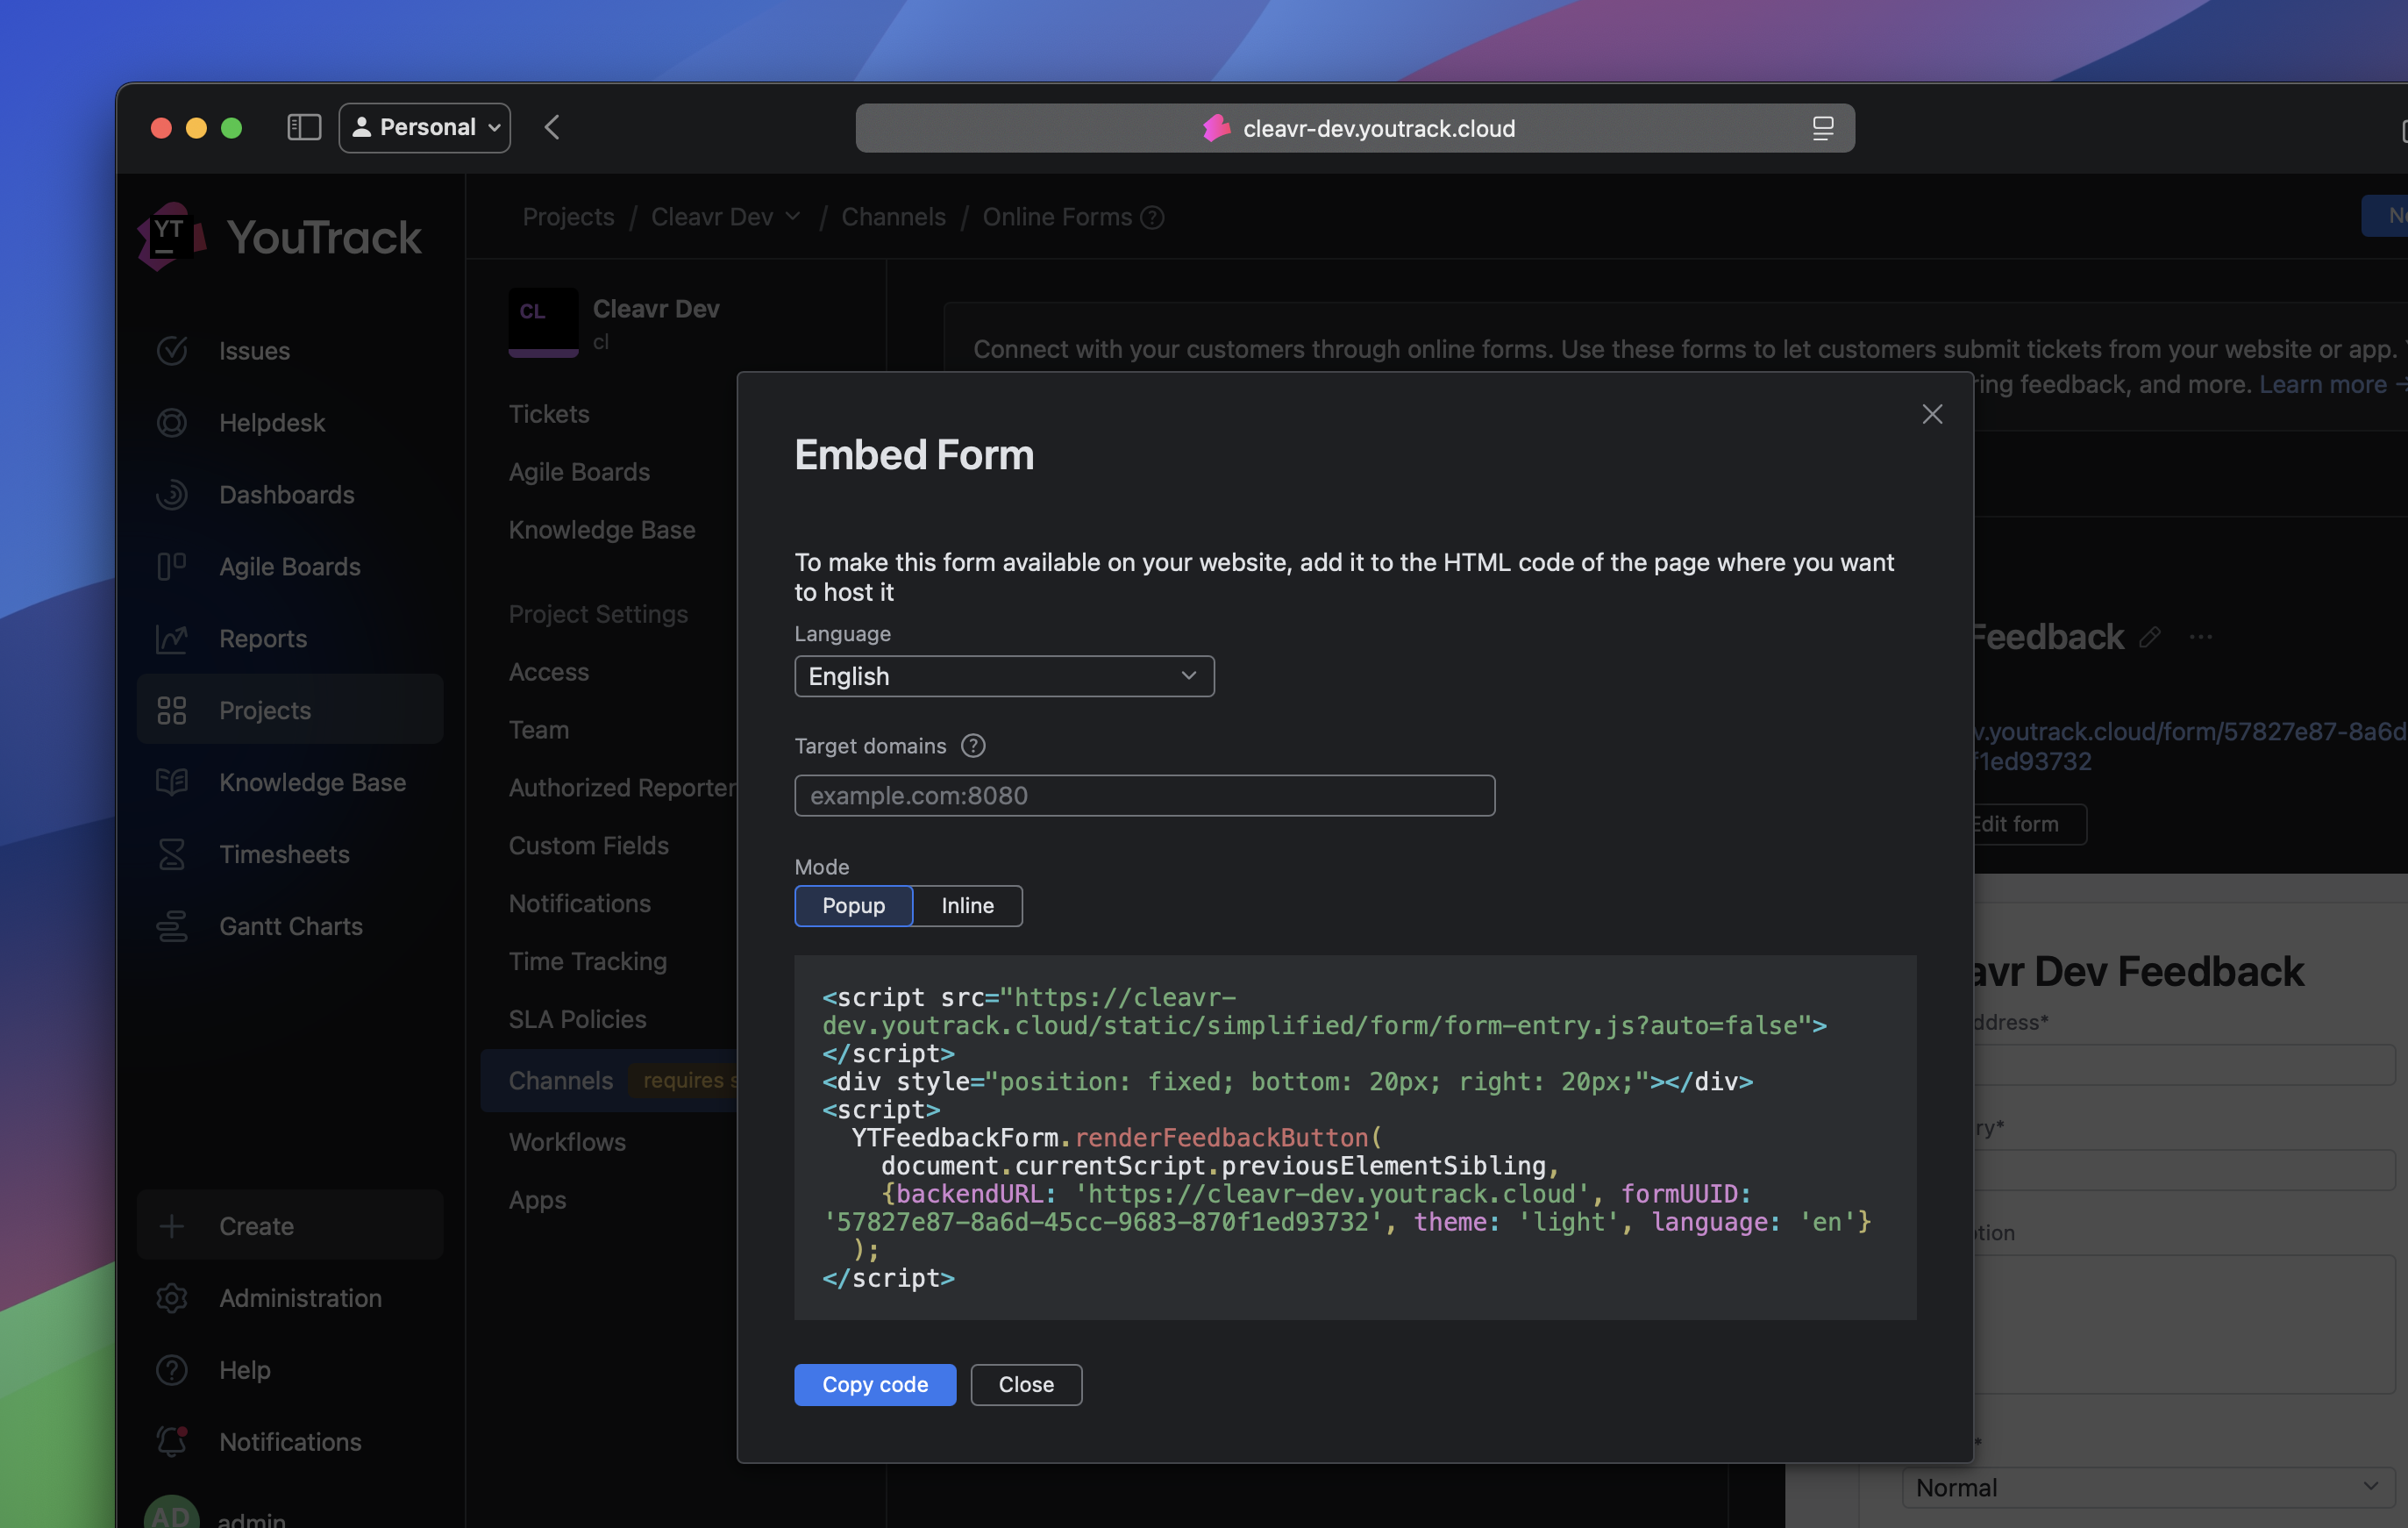
Once you have configured the Helpdesk project, you can navigate to the Channels page and select the option to set up an
Online Form to integrate into your web-based applications, allowing your users to submit support requests.
Clicking on the Embed option will display the scripts that need to be implemented in your codebase for the Helpdesk to work on your web app.
In this blog, we’ll use the popup mode to provide a better experience for users, so they won’t have to leave the page to submit a support request. Other than that, we’ll also be using Vue for the code examples.
The first step is to include the script that powers YouTrack’s Helpdesk form. If you want the support form to be accessible across
your entire application, you should include the script in your entry files, such as index.html or main.js.
<script src="https://cleavr-dev.youtrack.cloud/static/simplified/form/form-entry.js?auto=false"></script>
Now, we need to provide a mounting point for the Helpdesk form. We can do this with the following code:
<div ref="ytContainer" style="position: fixed; bottom: 20px; right: 20px" />
The above <div> element serves as a container for the Helpdesk form, and the ref allows us to easily reference this element in
our Vue component for mounting or interacting with the form.
Let’s create a button with a support icon that allows users to open the support popup.
<div>
  <button
    id="support-button"
    @click="toggleSupportForm"
  >
    <icon
      name="support"
    />
  </button>
</div>
Now, we can initialize the Helpdesk form with the appropriate credentials in the mounted hook of our component. You can refer to the Embed page in your Helpdesk project for your project-specific credentials.
mounted() {
 if (window.YTFeedbackForm && this.$refs.ytContainer) {
   window.YTFeedbackForm.renderFeedbackButton(this.$refs.ytContainer, {
     backendURL: 'https://cleavr.youtrack.cloud',
     formUUID: 'cfcc7b72-9bb6-4c3e',
     theme: this.theme === 'dark' ? 'dark' : 'light',
     language: 'en',
   })
 }
}
Let’s implement the method that will show the popup with the support form when the button with the support icon we created earlier is clicked.
toggleSupportForm() {
  const btn = this.$refs.ytContainer?.querySelector('button, a,  [role="button"]')
  btn?.click()
}
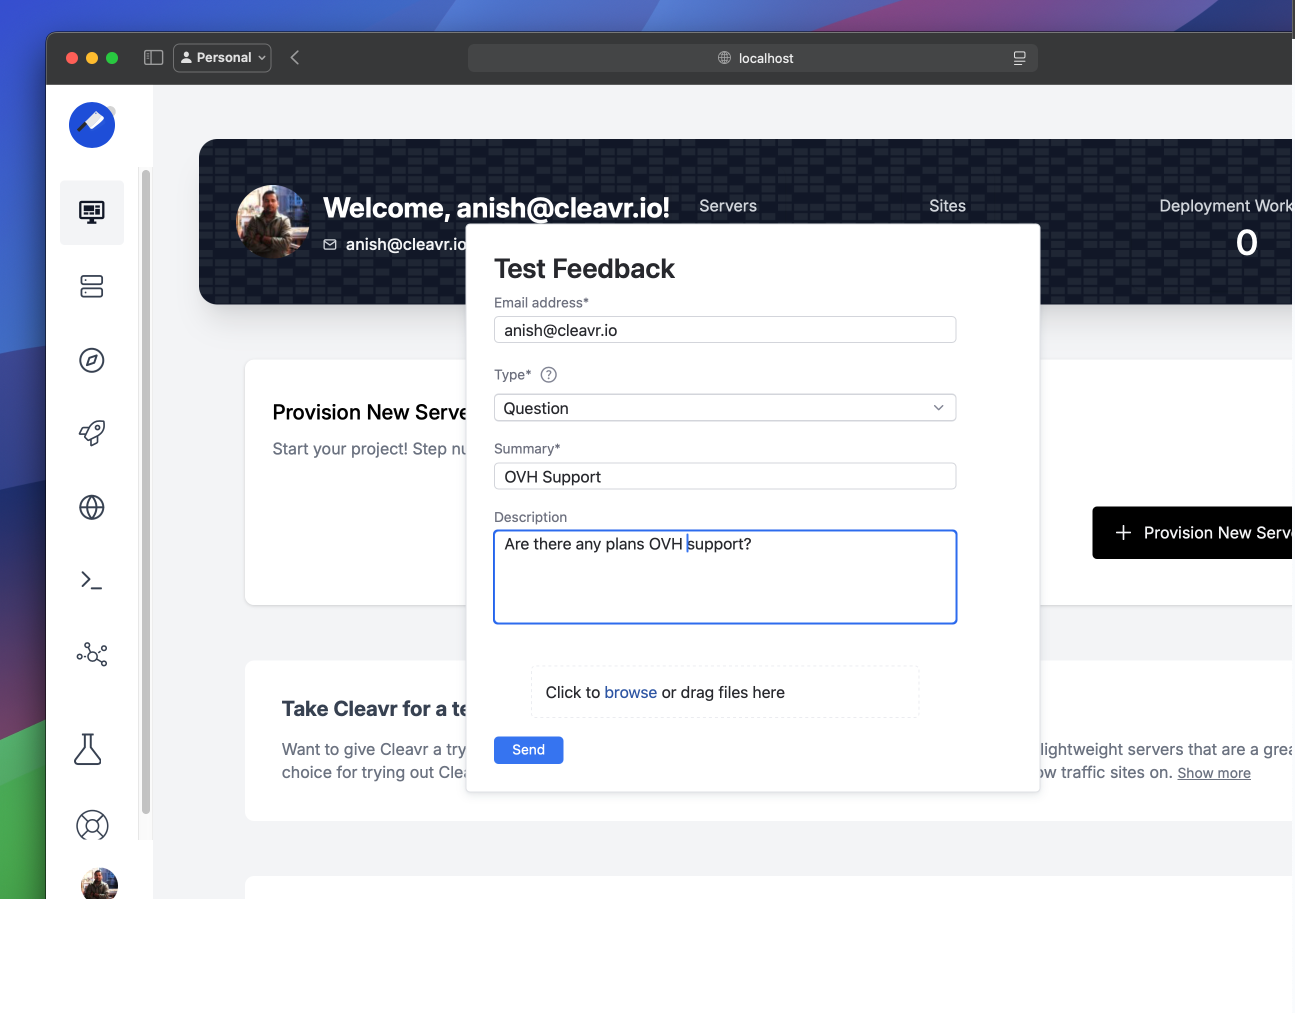
That’s it! You’ve successfully implemented Helpdesk in your application, and your internal users can now send support requests using the support form.
But let’s move ahead and improve the user experience by implementing a few more features: closing the support popup when clicked outside, prefilling and hiding some input fields, and centering the support popup.
First things first, let’s work on closing the popup when clicked outside the popup box. This can be confusing, as the popup won’t go away unless the same button used to open it is clicked again.
We will add an event listener that detects clicks outside the Helpdesk container, allowing us to close the popup when needed. We
can do this in the mounted hook, before initializing the support form.
document.addEventListener('click', this.handleClickOutside)
Remove the event listener we added to detect clicks outside the container in the beforeUnmount hook.
beforeUnmount() {
  document.removeEventListener('click', this.handleClickOutside)
}
Let’s implement handleClickOutside, which we attached to the document click event, to close the Helpdesk popup when the user clicks
outside its container.
async handleClickOutside(event) {
  const container = this.$refs.ytContainer
  if (!container) return


  if (event.target.closest('#support-button')) return


  const popup = document.querySelector('[data-test-shown="true"]')
  if (popup) {
    this.toggleSupportForm()
  }
}
Clicking on the support icon we created earlier to close the popup can cause a flickering issue, since it is also considered a click
outside the Helpdesk popup. To avoid this, we’ll detect and ignore the click on the support button using:
if (event.target.closest('#support-button')) return
If you are following this blog, make sure to add id="support-button" to the button used to open the support popup, or update it
accordingly.
When using Helpdesk for internal users, we may already know certain details, such as the user’s email, or we can provide the URL of the page the user is currently on, which can be useful for debugging and troubleshooting client issues. In such cases, we can prefill the known values.
window.YTFeedbackForm.getClientJSApi('cfcc7b72-9bb6-4c3e-8b66-840d80df63f6').then(async (form) => {
  form.setBlockValue('email', this.auth?.email || '')
  form.setBlockValue('page url', window.location.href)
})
While toggling the support popup, we can use YouTrack's API setBlockValue to set the values of such fields with known data.
Fields such as the page URL may serve no purpose for users and can be overwhelming when there are too many input fields just to submit a support request.
We can hide such fields, but to do so, let’s write a little CSS. We thought Helpdesk would have some configuration for internal fields, but we didn’t find any related documentation.
div[data-test-title="Page URL"] {
 display: none !important;
}
Let’s implement one last improvement, which will conclude this blog. We want to ensure the support popup is fixed on top of all other elements and centered in the viewport.
Add the following CSS to your project’s CSS file:
[data-test~="ring-popup"] {
 position: fixed !important;
 z-index: 2147483647 !important;
 pointer-events: auto !important;
}


[data-test~="ring-popup"][role="presentation"] {
 top: 50% !important;
 left: 50% !important;
 transform: translate(-50%, -50%) !important;
}
To configure a custom email address such as support@cleavr.io instead of
service@youtrack.cloud, you first need to set up a new email account using IMAP.
Once you have the required credentials, configure the mail integration in the
following locations:
Projects>Your Helpdesk Project>Channels>Email
From here, you can select the option to connect to an external mail server. Then, choose the connection type and configure your email channel accordingly.

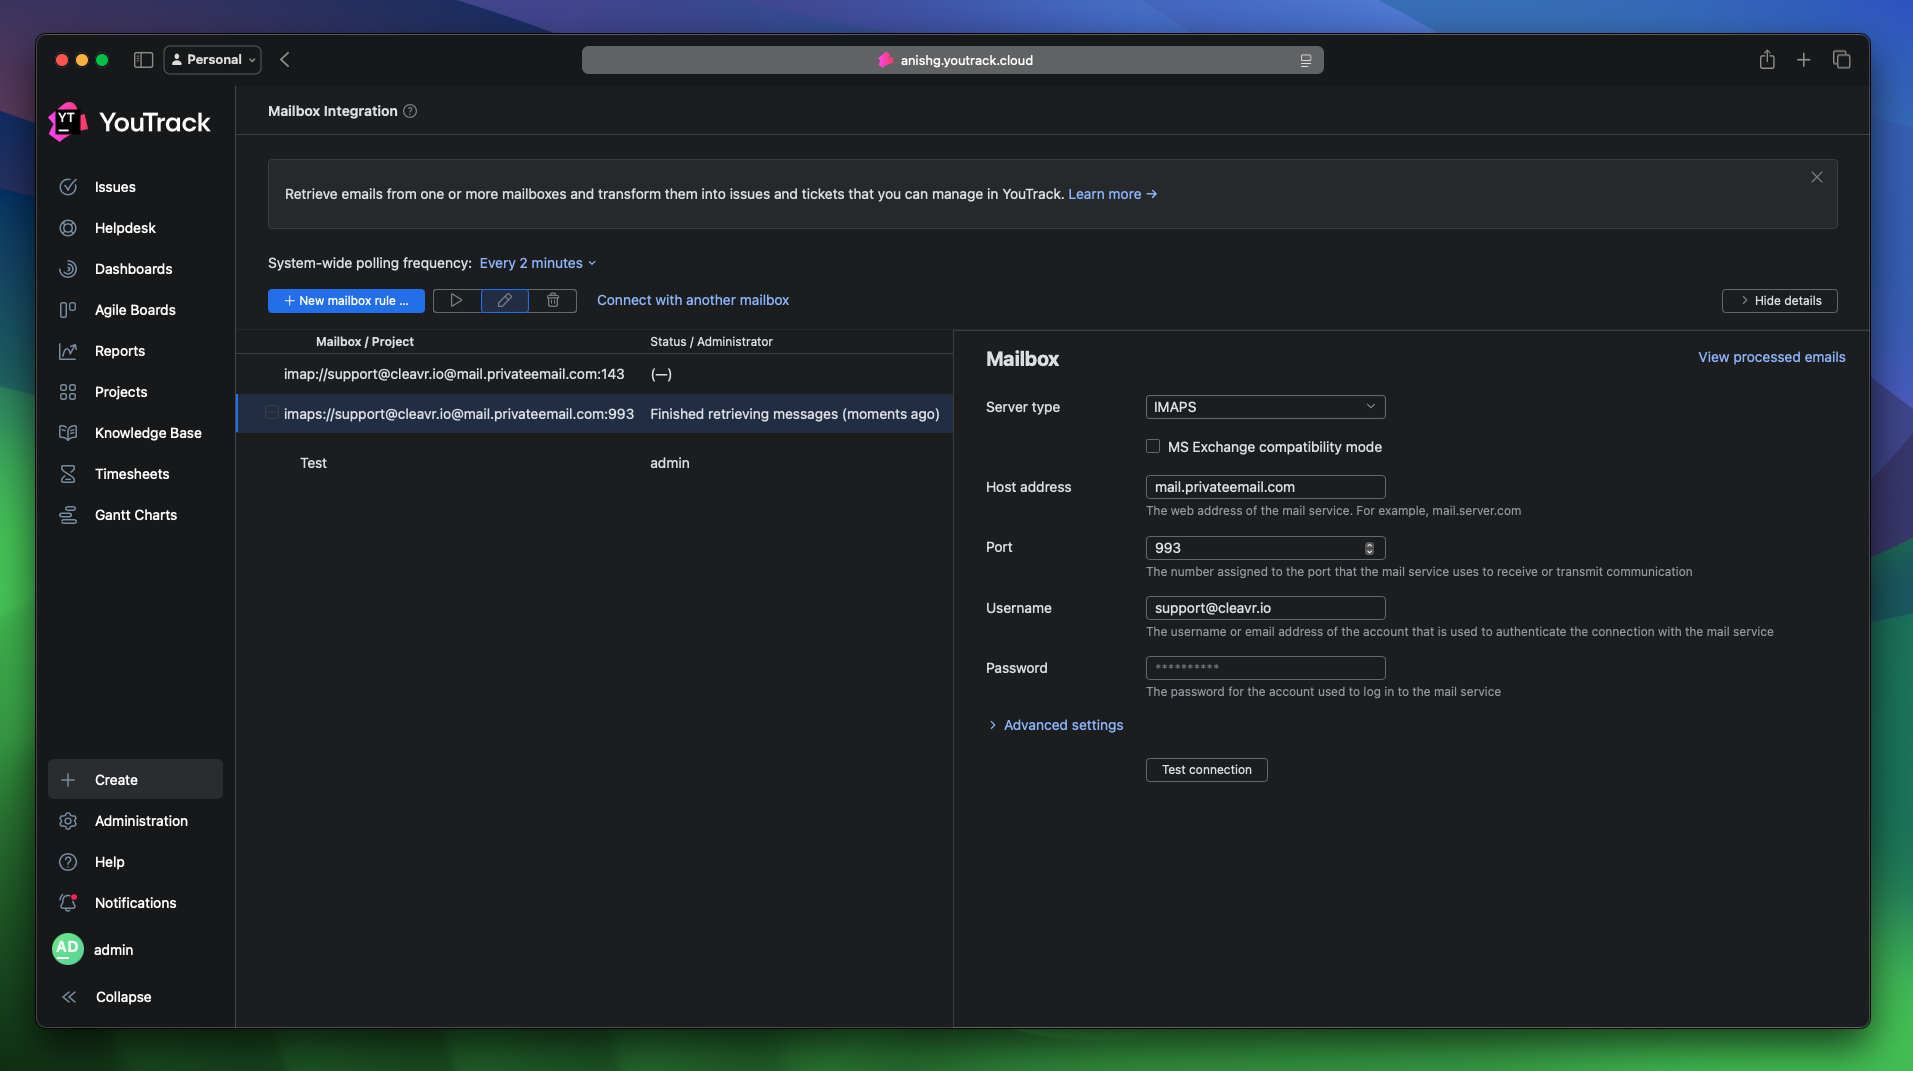
Administraion>Integrations>Mailbox Integration
As discussed above, you can similarly configure your mailbox using the credentials from your mail server.
Administraion>Server Settings>Global Settings>Notifications
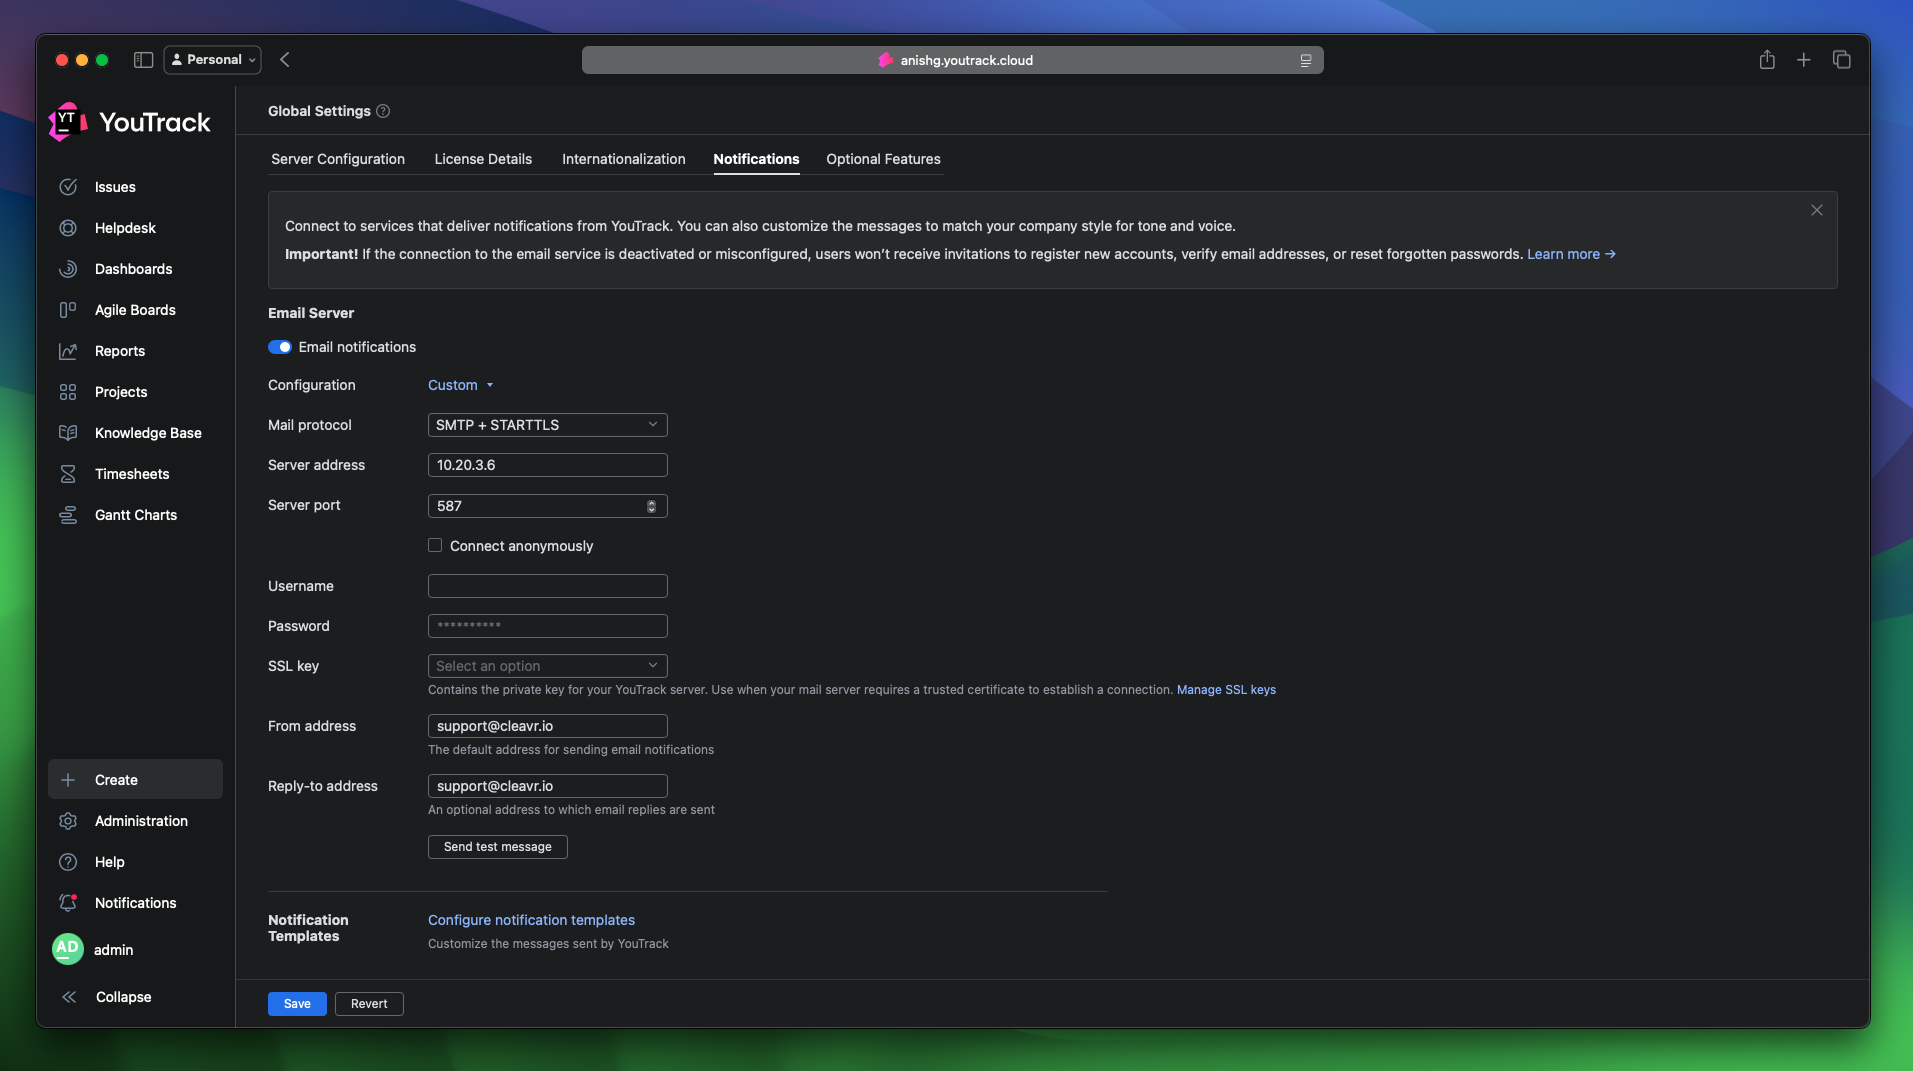
Lastly, you’ll need to enable email notifications here and update the configuration on the global notification settings page.
Thank you for following along with this blog to the end. That’s it for today. Stay tuned, and we’ll share more of our experiences soon.
Take control of your servers and deployments.Without breaking a sweat.
Sign up for a 5-day free trial of Cleavr Pro. No credit card required until you decide to subscribe.
Sign up for freeCleavr
© 2026 Vistafari LLC. All rights reserved.
❤️ ☕️ 🎨